Hydraulic Cylinder Assembly
 When it comes to assembling a hydraulic cylinder, we know what is important.
After all components are manufactured to the proper specifications,
surface finish and tolerances, it is assembly time. Proper seal selection
provides the final assurance that the cylinder is rated to withstand
the pressures of its intended application. See our seal
page.
When it comes to assembling a hydraulic cylinder, we know what is important.
After all components are manufactured to the proper specifications,
surface finish and tolerances, it is assembly time. Proper seal selection
provides the final assurance that the cylinder is rated to withstand
the pressures of its intended application. See our seal
page. Clean, clean, clean, components, zero contamination is the key. Hydraulic cylinders should be built in a dust-free clean room environment.

Trust us, Eagle manufactures over 100,000 cylinders per year. All cylinders 100% Tested to perfection, Eagle manufactures high quality reliable cylinders that are built to last.
Pre Assembly Check
-
1
PISTON/GLAND & OTHER COMPONENTS
No burrs in drilled holes, ports, threads etc... Smooth, sharp free edges No contamination such as weld slag, metal chips, dirt etc... -
2
TUBE BORE
No burrs in drilled holes, ports, threads etc... Clean and dry, free of any contamination ID finish is smooth and scratch free. -
3
RODS
Wiped clean, no dings, pits or scratches on the surface Free of splatter. -
4
WELDS
Uniform, sound, free of porosity, inclusions, undercutting Free of splatter and slag. -
5
SEALS
Use FIFO procedures (first in first out) Visual check for contamination or abnormal condition Refer to the assembly drawing for proper positioning and orientation of seals. Ensure installation tooling has no sharp edges or surfaces that may cause damage.

Wash Process
Check all parts for burrs or sharp edges. Burrs could damage the piston and gland seals or prevent proper assembly of parts. If burrs are found, inform supervisor, use proper tooling to remove burrs and sharp edges
- BARRELS / TUBES
- 1. Place cylinder tubes on wash tank properly.
- 2. Inspect barrels for burrs on port holes and mouth of the barrel. Deburr as required.
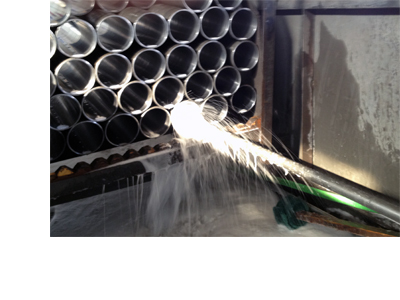
- 3. Wash and scrub the ports with Scotch-brite or equivalent. The complete barrel OD must also be free of carbon and slag from the welding process.
- 4. Rinse the inside of the tubes using cleaning detergent, ensure that the barrel or tube is saturated with the fluid.
- 5. Using the proper size brush, brush inside barrel.
- 6. Blow tubes out with airline and proper wand. Ensure that wand is not leaving scratches in the barrel ID.
- 7. Using the brush, place a clean rag over the end and wipe out the inside of the barrel or tube, blowing the particles off the rag with each wipe.
- 8. Blow the barrel out again, including ports and threads, using the proper wand as per instructions. Again, ensure that the wand is not leaving scratches in the barrel ID.
- 9. Inspect the barrel, using a light, checking for metal chips, lint from the rags, or residual dust.
- 10. Repeat steps if contamination is still present.
- 11. Move barrels immediately to assembly when cleaning is completed
- 12. Wrap up completely to protect from contamination while waiting for assembly.
- CYLINDER RODS
- 1. Wipe clean with a lint free rag, ensure all contamination is removed, especially around welded joint.
- PISTONS, GLANDS, CAPS, ETC...
- 1. Place parts (pistons, glands and caps) in the track of the parts washer.
- 2. Release Emergency Stops on main power panel at back end of machine and conveyor.
- 3. Push green system start button. (if necessary)
- 4. Pull green buttons to turn on all stages.
- 5. The temperature of the First and Second stage tanks should be about 140 F.
- 6. Air dry parts with airline after they have cycled through the washer.
- 7. Visually check if parts are clean.
- 8. Rewash if necessary.

Hydraulic Cylinder Assembly
- ROD ASSEMBLY
- Secure rod into proper fixture
- Wipe surface clean
- Oil seals with proper brush
- Carefully slide gland on rod, without damaging seals on inside of gland.
- Slide piston onto end of rod in orientation as per the drawing
- Double check installation
- Use specified nut or bolt from drawing and apply oil or loctite
- Use impact gun with proper socket to drive bolt or nut onto rod
- Torque nuts and bolts to drawing specifications using torque wrench.
- Oil seals around piston and gland, using proper brush
- Oil around inside of opening of the tube
- Oil Seals with proper brush
- Oiling the seals makes placing rod into tube easier and the seals are not likely to be damaged during assembly
- Rod is ready to install to tube

- TUBE ASSEMBLY
- Secure or mount tube in proper fixture
- Visually inspect port and welds
- With light check that the tube bore is clean and free of contamination
- Hold rod assembly horizontal by hand or device
- Slide piston end into the tube
- Check threads for burrs
- Apply anti-seize, loctite or hydraulic oil to the barrel threads or the gland as per drawing requirements
- If internally threaded, use the two-piece tube guides, placed on threads
- Carefully push the rod assembly into the tube bore about halfway, slide the gland into the tube past the gland seals, being careful not to pinch the seals between the gland and tube
- Thread gland into tube or thread the external lock ring
- See the assembly drawing for proper torque requirements
- Set torque wrench to proper setting
- Pull down on torque wrench until the wrench 'clicks', which indicates that the torque is set
- Do not over-torque
- BARRELS / TUBES